Demystifying TLS
What is TLS? How does it work? And, What the heck does SSL has to do with TLS? Even after so many years of the protocol’s inception, questions like these remain a mystery to many. In this article, we will not just touch upon the topic of TLS but go in-depth and try to understand its purpose and functioning along with some related topics.
Let us first understand why TLS even came into the picture.
The year was 1994. The internet was growing, and there was a need for securing messages transmitting over it. To make this possible, Taher Elgamal, chief scientist at Netscape Communications, “father of SSL”, in 1994, introduced the protocol Secure Socket Layer(SSL) to the world. However, because of its security flaws, version 1.0 of it never got officially released.
The first official release of SSL, version 2.0, came out in 1995, and its final version, SSL 3.0, was released in November 1996.
The protocol was designed to provide privacy, critical security, and integrity to the data transmitting over any computer network.
Browsers war and inception of TLS 1.0
The Netscape/Microsoft browsers war in the mid-90's was really competitive. Microsoft decided to revise the SSL 2.0 protocol with some additions of their own and specified a protocol called Private Communications Technology(PVT). The protocol was only supported in IE and IIS. As a part of the horsetrading between Netscape & Microsoft, some changes were made to SSL 3.0, and the protocol was later renamed to TLS 1.0, which was in reality just SSL 3.1. You can read more about TLS 1.0 history in this article of Tim Dierks, who was Vice President of Engineering at Consensus Development Corp at that time.
TLS 1.0 was first defined in January 1999 as an upgrade of SSL version 3.0. According to RFC 2246, “the differences between this protocol and SSL 3.0 were not dramatic, but they were significant enough to preclude interoperability between TLS 1.0 and SSL 3.0”.
TLS 1.3 (Latest Version)
TLS 1.1 was defined in April 2006, and TLS 1.2 in August 2008. The latest version of TLS, i.e., 1.3, was introduced in August 2018. Significant changes in these versions were made considering enhanced performance & robust security. You can read more about the differences between these versions here. Support for TLS versions 1.0 and 1.1 was widely deprecated by websites around 2020. As of now, TLS 1.2 is currently the most used version of TLS.
Now that we know the reasons behind TLS’s inception, we are ready to proceed with the understanding of its usecases.
We all see a padlock symbol in the address bar whenever we visit a web address that begins with https, right? But, what does this symbol mean? What is its significance?
The symbol means that the webpage we are visiting is secure, and this security is provided by TLS protocol. It ensures that the connection to the website we see is encrypted and prevents any other party from eavesdropping.
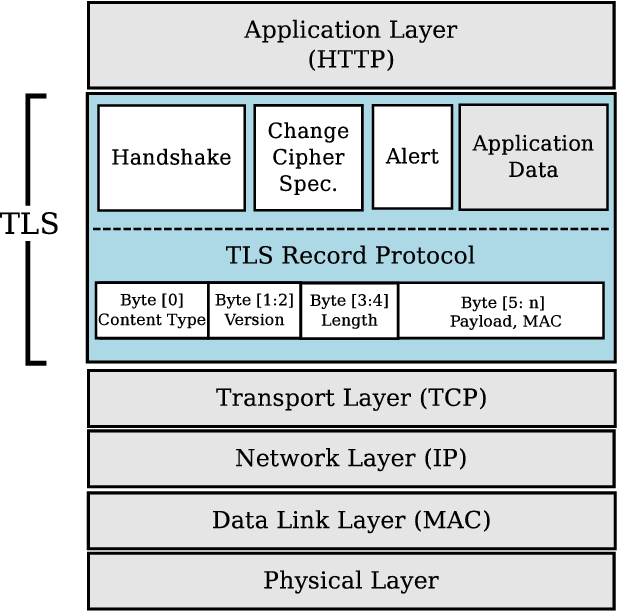
TLS is mainly used with HTTP to give us a more secure protocol, i.e., HTTPS; however, HTTP isn’t the only protocol with which TLS is used. TLS is generally implemented on top of TCP to encrypt Application Layer protocols such as HTTP, FTP, Telnet, SMTP, IMAP. However, it is also implemented on Transport Layer Protocols such as UDP, DCCP, and SCTP(e.g., VPN), and the resultant protocol is known as Datagram Transport Layer Security(DTLS).
So, what are these Application and Transport layers?
These layers are part of the TCP/IP model. Understanding this model’s working will help us understand TLS better, so let’s dig a little further into this.
TCP/IP model
Messages on Internet are transmitted in the form of data packets. These data packets contain information like source, destination, and the actual message(payload). The data packets are handled at each layer of the stack. This stack is commonly known as the TCP/IP model and contains the following layers in the below-mentioned order.
- Application Layer (e.g. FTP, Telnet, HTTP)
- Transport Layer (TCP or UDP)
- Internet Layer (IP)
- Network Access Layer (e.g., Ethernet)
Packets are constructed in such a way that layers for each protocol used for a particular connection are wrapped around the packets, like the layers of skin on an onion.
At each layer, a packet has two parts: the header and the body. The header contains protocol information relevant to that layer, while the body contains the data for that layer which often consists of a whole packet from the previous layer in the stack. Each layer treats the information it gets from the layer above it as data and applies its own header to this data.
At the application layer, the packet consists simply of the data which is to be transferred (for example, part of a file being transferred during an FTP session). As it moves to the transport layer, the Transmission Control Protocol (TCP) or the User Datagram Protocol (UDP) preserves the data from the previous layer and attaches a header to it. At the next layer, IP considers the entire packet (the TCP or UDP header and the data) as the data and directly attaches its own IP header. Finally, Ethernet or another network protocol considers the entire IP packet passed as data and attaches its header at the network access layer.
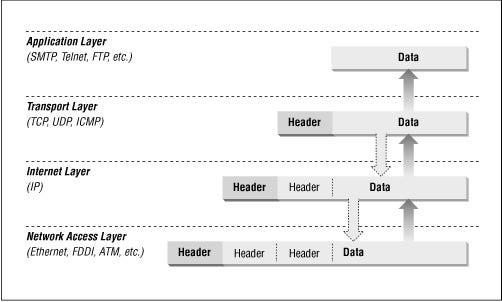
On the other side of the connection, this process is reversed. As the data is passed up from one layer to the next higher layer, each header (each skin of the onion) is stripped off by its respective layer. For example, the Internet layer removes the IP header before passing the encapsulated data to the transport layer (TCP or UDP).
Read more about these layers and how they handle the data packets here.
Data transmission and HTTPS
Irrfan, an employee of the company Itfinity, uses the company’s website’s messaging service to send a message to his colleague Seema over an unsecured network. The website doesn’t have HTTPS configured. An attacker can inject a script on the website, hijack the session and intercept Irrfan’s message. Any sensitive information in the message will be available for the attacker to read since it will be in plaintext form. The attacker may even decide to alter it and relay false information to Seema by impersonating Irrfan. Such kind of attack is known as Man in the middle attack(MITM). This cyber-attack can wreak havoc on businesses in multiple ways. Nullius in Verba, check for yourself. Read about DigiNotar and Equifax, two of the very famous known cases of MITM attacks.
The above example tells us how easy it becomes for an attacker to impersonate someone when there’s no security involved. If the website had HTTPS configured, it would’ve been nearly impossible for an attacker to eavesdrop on their conversation. The example sheds light on three main problems here.
- The attacker can read the message sent by Irrfan because it’s in plain text form.
- The attacker can impersonate Irrfan.
- Attacker can alter the message and forward a false message to Seema.
TLS comes to the rescue
Well, this is not a lost cause as we already have a solution for this, and it’s TLS. We’ll discover how TLS addresses the above problems in the following sections.
There are three main components to what the TLS protocol accomplishes:
Encyrption
Suppose the messaging service Irrfan uses encrypts the message before sending and decrypts it on the other end, then the attacker won’t be able to read the message. The message won’t be of any use to the attacker since it’ll be in encrypted form. However, the attacker can still impersonate one of the parties and relay an altered message.
Okay, now the question comes, how do we encrypt the messages?
Cryptography
Cryptography is a method of protecting information and communications through the use of codes, so that only those for whom the information is intended can read and process it. This concept of ciphering information is not new. It has been in existence for thousands of years.
In computer science, cryptography refers to secure information employing algorithms to transform messages in ways that are hard to decipher. However, in today’s computer-centric world, cryptography is most often associated with scrambling plaintext into ciphertext(encryption), scrambling ciphertext back into plaintext(decryption), and hashing.
The development of cryptography has been paralleled by the development of cryptanalysis — the “breaking” of codes and ciphers. If you’ve seen the movie “The Imitation Game”, then you know what I’m talking about here.
Until the 1960s, secure cryptography was largely the preserve of governments. Two events have since brought it into the public domain: the creation of a public encryption standard (DES), and the invention of public-key cryptography.
Private key cryptography
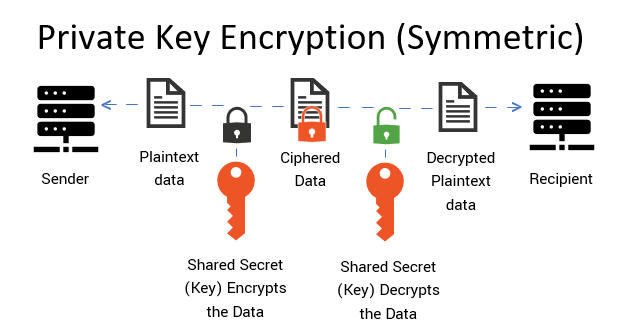
Private key encryption is the original type of encryption. Dating back to the advent of cryptography, private key cryptosystems were the first and continue to be the most common. When using private key cryptography, both parties either possess or exchange the private key.
With an ancient cipher, like the Caesar cipher, the private key was simply a number that corresponded to the number each alphabetical character needed to be shifted. In current digital encryption schemes, the keys are now prohibitively difficult algorithms that no modern computer could ever efficiently crack.
The one thing that remains the same with all private key systems is that the same key can encrypt and decrypt. Private key encryption is sometimes referred to as symmetric encryption.
By using symmetric encryption algorithms, data is converted to a form that cannot be understood by anyone who does not possess the secret key to decrypt it. Once the intended recipient who possesses the key has the message, the algorithm reverses its action to return the message to its original and understandable form. The secret key that the sender and recipient both use could be a specific password/code, or it can be a random string of letters or numbers that have been generated by a secure Random Number Generator(RNG).
There are two types of symmetric encryption algorithms:
- Block algorithms: Set lengths of bits are encrypted in blocks of electronic data using a specific secret key. As the data is being encrypted, the system holds the data in its memory as it waits for complete blocks.
- Stream algorithms: Data is encrypted as it streams instead of being retained in the system’s memory.
Some examples of symmetric encryption algorithms include:
- DES (Data Encryption Standard)
- AES (Advanced Encryption Standard)
- IDEA (International Data Encryption Algorithm)
- Blowfish
- RC4 (Rivest Cipher 4), RC5, RC6
DES, AES, IDEA, Blowfish, RC5, RC6 are block ciphers. RC4 is a stream cipher.
While symmetric encryption is an older encryption method, it is faster and more efficient than asymmetric encryption, which we will discuss in the next section. Symmetric cryptography is typically used for bulk encryption/encrypting large amounts of data, e.g., for database encryption.
The most important disadvantages of symmetric encryption are the key distribution problem and the key management problem. When the number of connected users grows, so does the number of required keys. Management of an increasing number of secret keys becomes a “key management problem.” Further, symmetric cryptography ensures only the ‘confidentiality’ of the transmitted or stored data. It cannot be used to ensure its integrity and authenticity.
Public key cryptography
Public key encryption, or public-key cryptography, is a method of encrypting data with two different keys by making one of the keys, the public key, available for anyone to use. The other key is known as the private key.
Data encrypted with the public key can only be decrypted with the private key, and data encrypted with the private key can only be decrypted with the public key. Public key encryption is also known as asymmetric encryption. It is widely used, especially for TLS/SSL, which makes HTTPS possible.
Public key cryptography can seem complex for the uninitiated; fortunately, a writer named Panayotis Vryonis came up with an analogy that roughly follows:
Imagine a trunk with a lock that two people, Bob and Alice, use to ship documents back and forth. A typical lock has only two states: locked and unlocked. Anyone with a copy of the key can unlock the trunk if it’s locked and vice versa. When Bob locks the trunk and sends it to Alice, he knows that Alice can use her copy of the key to unlock the trunk. This is essentially how what’s known as symmetric cryptography works: one secret key is used for both encrypting and decrypting, and both sides of a conversation use the same key.
Now, imagine, instead, that Bob makes a trunk with a special kind of lock. This lock has three states instead of two:
A. Locked, key turned all the way to the left
B. Unlocked, in the middle.
C. Locked, key turned all the way to the right.
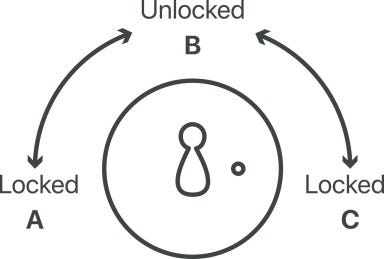
Instead of one key, two keys go with this lock:
- Key No. 1 can only turn to the left
- Key No. 2 can only turn to the right
If the trunk is locked and the key is turned to position A, only key No. 2 can unlock it by turning right to position B (unlocked). If the trunk is locked in position C, only key No. 1 can unlock it by turning the lock left to position B.
In other words, either key can lock the trunk — but once it is locked, only the other key can unlock it.
Now let’s say Bob makes a few dozen copies of key No. 2, the key that only turns right, and shares them with everyone he knows and anyone who wants a copy, making it his public key. He keeps key No. 1 for himself — it’s his private key. What does this accomplish?
- Alice can send Bob confidential data via the trunk and be confident that only Bob can unlock it. Once Alice has locked the trunk with the public key, which turns from left to right, only a key that can turn right to the left can unlock it. That means only Bob’s private key can unlock it.
- Alice can be sure that the trunk is actually from Bob, and not an impersonator, if it’s locked with his private key. There’s only one key that can lock the trunk so that the lock is in position A, or turned all the way to the left: Bob’s private key. True, anyone can unlock it with the public key by turning the key to the right, but it’s guaranteed that the trunk is from Bob.
Some examples of asymmetric encryption algorithms include:
- Rivest-Shamir-Adleman (RSA)
- Elliptic Curve Digital Signature Algorithm (ECDSA)
- Digital Signature Algorithm (DSA)
Authentication
Authentication is the process of recognizing a user’s identity. It is the mechanism of associating an incoming request with a set of identifying credentials.
The authentication process always runs at the start of any application, before the permission checks occur, and before any other message is allowed to proceed. Different systems may require different types of credentials to ascertain a user’s identity. The credential often takes the form of a password, which is a secret and known only to the individual and the other party.
One of the most popular ways to authenticate identity is to authenticate it using its digital certificate.
Digital certificate
A digital certificate is a digital document that includes the public key bound to an individual, organization, or computer. A digital certificate is issued by a Certificate Authority (CA) who documents policies for determining owner identity and distributing certificates.
A digital certificate acts as an electronic credential and verifies that the person presenting it is truly who it claims to be. In this respect, a certificate is similar to a passport. Both establish an individual’s identity, contain a unique number for identification purposes, and have a recognizable issuing authority that verifies the credential as authentic. In the case of a certificate, a CA functions as the trusted third party that issues the certificate and verifies it as an authenticated credential.
For authentication purposes, certificates make use of a public and a private key. The issuing CA binds these keys and other information about the certificate owner to the certificate itself for identification purposes.
When a user visits a website, e.g., itfinity.com, its digital certificate helps the user confirm whether they actually landed at itfinity.com. If you click on the padlock icon, you can see the digital certificate for the website you’ve visited.
Most digital certificates in use today follow what is known as the X.509 standard. X.509 is used in SSL/TLS, so yes, it’s what’s being used in HTTPS, FTP, Telnet, and other secure data transfer protocols. Let’s now look at the kind of information we can find in an X.509 certificate.
- Information about the subject a.k.a. Subject Name — ‘subject’ refers to the site represented by the cert.
- Information about the Certificate issuer/Certificate Authority (CA) — The CA is the body that issued and signed the certificate. More on this later.
- Serial number — This is the serial number assigned by the issuer to this certificate. Each issuer must make sure each certificate it issues has a unique serial number.
- Version — The X.509 version used by a given certificate. Most of the time, you’ll find this value to be 3.
- Validity period — Certificates or certs are not meant to last forever. The validity period defines the period over which the cert can still be deemed trustworthy.
- Signature — This is the digital signature of the entire digital certificate, generated using the certificate issuer’s private key. More on this later.
- Signature algorithm — The cryptographic signature algorithm used to generate the digital signature (e.g., SHA-256 with RSA encryption).
- Public key information— Information about the subject’s public key. This includes:
* Algorithm (e.g., ECDSA)
* Key size (e.g., 256 bits)
* Key usage (e.g., can encrypt, verify, derive)
* Public key itself
This is how a decoded digital certificate looks like in Firefox:
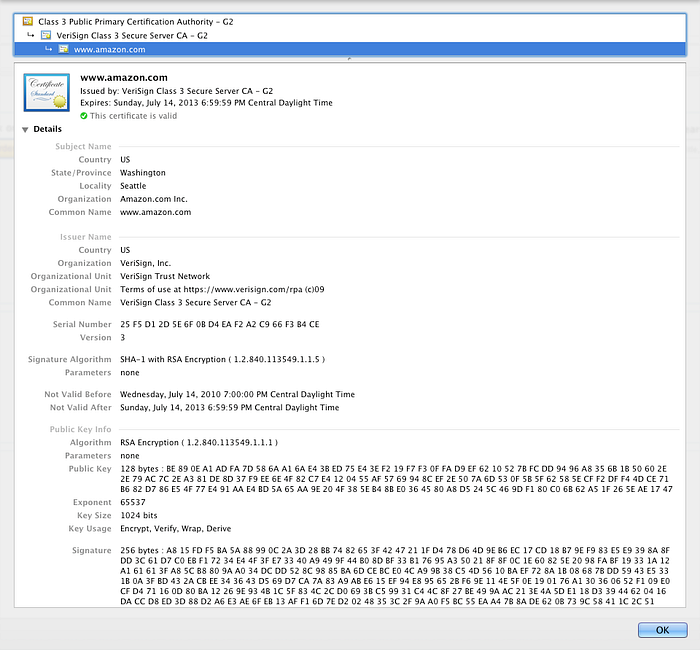
If you want to check a website’s SSL certificate in Firefox, click on the padlock icon in the address bar, click on Connection secure followed by More Information. This will open up the Page Info window of the website. Now click on View Certificate in the Security tab, and there you’ll find the decoded Digital certificate.
Certificate Authorities
Another element of a digital certificate that does more than provide information is the certificate’s digital signature. As mentioned earlier, the certificate’s digital signature is generated using the certificate issuer’s private key. A cert’s digital signature can be used in authentication. But for a web client to verify/authenticate a digital signature, it will need a copy of the issuer’s public key.
If the issuer happens to be a widely recognized certificate authority (CA), that won’t be a problem. A copy of that CA’s public key will likely be pre-installed in the user’s web browser. Popular Web browsers like Chrome, Firefox, Safari, and Internet Explorer all come with the certificates of recognized CAs. That means they already contain copies of those certificate authorities’ public keys and can therefore be used for verifying certificates issued/signed by them.
Certificates signed by widely recognized CAs are called signed certificates. Some certificates are signed by issuers who aren’t widely recognized certificate authorities. For example, when you create your own digital certificate using Openssl but don’t bother processing a Certificate Signing Request (CSR), you will end up with what is known as a self-signed certificate.
Signed vs. Self-signed certificates
In theory, certificate authorities should exercise due diligence before signing digital certificates submitted to them through CSRs. They need to verify first whether the information placed on the digital certificates is in fact, accurate. This is important because their attestation would later on serve as the sole basis that certain websites who are able to present certs signed by them can really be trusted.
So, assuming due diligence is really exercised, it would be safe to assume that signed certificates are more reliable and trustworthy than self-signed certificates. In fact, when a user attempts to connect to your site, and your site only has a self-signed certificate, the user’s browser will display something like this:
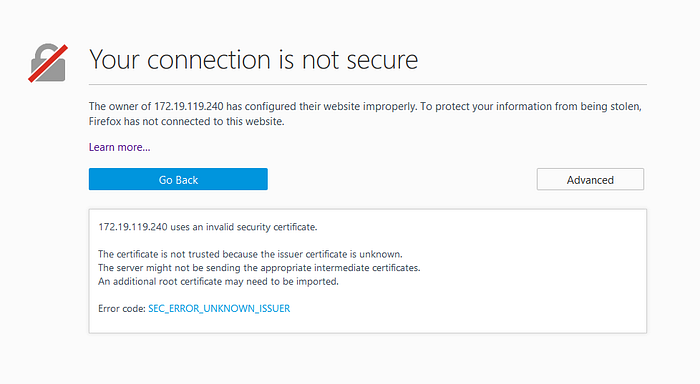
Self-signed certificates are relatively safe to use internally, i.e., within your organization, where you have more control over the servers that operate in the network.
Encryption vs Signature
Message encryption provides confidentiality. Allows users to encrypt the document with the public key, which can be decrypted only with the corresponding private key. To put it in simple terms, when encrypting, you use the recipient’s public key to write a message, and the recipient uses their private key to read it.
Message signing, on the other hand, binds the identity of the message source to the message. It ensures data integrity, message authentication, and non-repudiation altogether. When signing, you use your private key to write the message’s signature, and the recipient uses your public key to check if it’s really yours.

Data Integrity
Data integrity is the maintenance of, and the assurance of, data accuracy and consistency over its entire life-cycle and is a critical aspect of the design, implementation, and usage of any system that stores, processes, or retrieves data.
The term is broad in scope and may have widely different meanings depending on the specific context. It is sometimes used as a proxy term for data quality. Data integrity is the opposite of data corruption. The overall intent of any data integrity technique is the same: ensure data is recorded exactly as intended. Moreover, upon later retrieval, ensure the data is the same as when it was originally recorded. In short, data integrity aims to prevent unintentional changes to information. Data integrity is not to be confused with data security, the discipline of protecting data from unauthorized parties.
You can understand data integrity with the help of our previous example in which Irrfan and Seema exchanged messages over an unsecured network. Data integrity, in this case, could be compromised if some packets go missing while transferring the messages. However, the chances of this happening are low, but they’re not zero.
Data can also be compromised if an attacker intercepts the request and add/remove some piece of information to/from the original message. In any of these cases, the receiver won’t receive the exact message which the sender had sent.
Checksum
You may have noticed that when you download files from certain websites, the files have a very long string of numbers and letters attached to them. This string of numbers and letters is called a checksum. These long strings act as fingerprints for that particular file, whether it be an EXE, ISO, ZIP, etc. Checksums are used to ensure the integrity of a file after it has been transmitted from one storage device to another. This can be across the Internet or simply between two computers on the same network. Either way, you can use a checksum to ensure that the transmitted file is the same as the source file.
A checksum is calculated using a hash function and is usually posted along with the download. To verify the file’s integrity, a user calculates the checksum using a checksum calculator program and then compares the two to make sure they match.
Checksums are used to ensure a corrupt-free transmission and ensure that the file has not been tampered with. Even a tiny change to the file will result in a completely different checksum value when a good checksum algorithm is used.
The most common checksums are MD5 and SHA-1, but both have been found to have vulnerabilities. Due to these security concerns, the newer SHA-2 is considered the best cryptographic hash function.

Cipher suite
Before establishing a communication session, both the client and server have to agree on a set of algorithms. A set of such algorithms forms what is known as Cipher suite or Crypto suite. Cipher suites dictate which of these algorithms the server should use to make a secure and reliable connection. The client application initiates the TLS handshake process. Part of that process involves notifying the server which cipher suites it supports. The server receives that information and compares the cipher suites supported by the client application with the algorithms it supports. If and when it finds a match of supported methods, the server notifies the client application and a secure connection is established. If it doesn’t find a match, the server refuses the connection.
Four components that make up a cipher suite are as follows:
- Key exchange algorithm
- Authentication algorithm
- Bulk data encryption algorithm
- Message Authentication Code(MAC) algorithm
If you want to see the crypto suite used to establish a connection with a website’s server, visit the website in Firefox. Make sure it has HTTPS as the protocol. Click on the padlock symbol -> Connection secure -> More information. In the Security tab, under the section Technical details, you can find the cipher suite used to establish connection with the website’s server. It’ll look something like DHE_RSA_AES256_SHA256. This particular cipher suite uses DHE for its key exchange algorithm, RSA as its authentication algorithm, AES256 for its bulk encryption algorithm where key size is 256 bits, and SHA256 for its Message Authentication Code(MAC) algorithm with key size 256 bits.
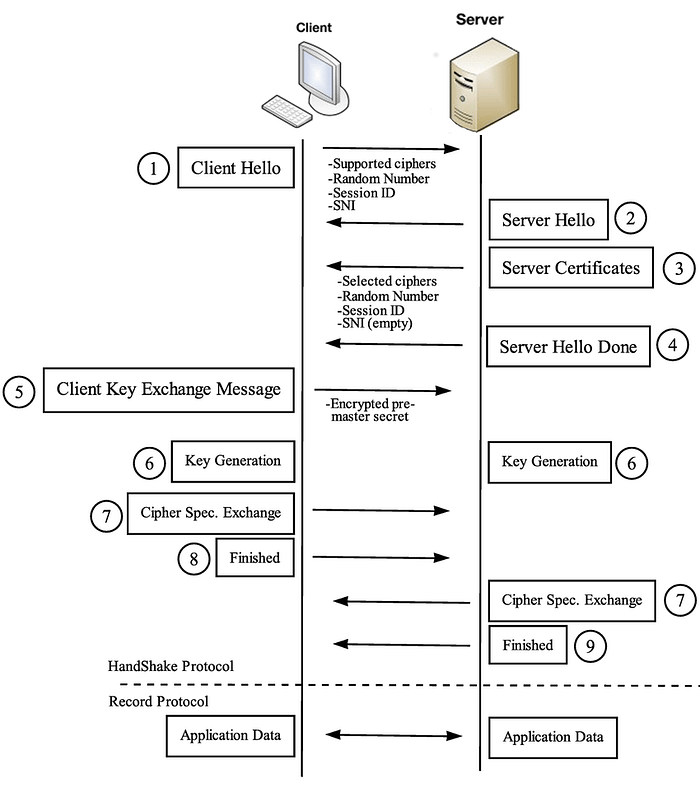
TLS handshake
A TLS connection is initiated using a sequence known as the TLS Handshake. When a user navigates to a website that uses TLS, the TLS handshake begins between the user’s device (also known as the client device) and the webserver.
During the TLS handshake, the user’s device and the webserver:
* Client sends a client.hello message to the server. This message contains the following information:
- Maximum TLS version that the client can support.
- A list of cipher suites client supports. The order in the list matters as preference is given to the suite which appears on top of the list.
client.random: A 32-byte random value. This value is used to prevent replay attacks and, later on, gets used to generate master secret.
* Server sends message server.hello in response to client.hello message. The message contains the following information:
- TLS version it will use.
- Cipher suite it’s going to use.
server.random: A 32-byte random value similar toclient.random.
* After sending `server.hello` message to the client, server sends another message to the client. The message contains the following information:
- Server’s certificate, which contains its public key.
- Digital signature containing all the information passed so far summarized in a hash form created using agreed-upon MAC algorithm.
- server.hello done.
* The client will check the authenticity of the server’s certificate by decrypting the digital signature using the public key embedded in the certificate.
* Client generates a 48-byte premaster secret by concatenating the protocol version(2 bytes) and some bytes that the client generates randomly(46 bytes). The client is supposed to get these 46 bytes from a cryptographically secure PRNG. In practice, this means using PRNG offered by the operating system (/dev/urandom, CryptGenRandom() etc.).
* The client then encrypts the 48-byte premaster secret with the server’s public key. The encrypted result is what the client sends to the server as the ClientExchange message.
* Meanwhile, a key derivation function(KDF) will generate the 48-byte master key derived from pre_master_secret, client.random and server.random.
master_secret = KDF(pre_master_secret, “master secret”, client.random, server.random);* Along with ClientExchange message, the client also sends two more pieces of information:
- Change cipher spec message: The message means that client has received all the required information and is ready to start sending messages encrypted via
master_secret. - finished message: The message contains a summary of all the messages sent so far in encrypted form. This prevents MITM attacks.
* Upon receiving encrypted pre_master_secret from the client, the server will decrypt it using its own private key. The server will also generate the master_secret similar to how the client did.
* Server will send the following information to the client:
- Change cipher spec message.
- finished message encrypted using the
master_secret.
The above handshake process is described keeping in mind the algorithms used for Key Exchange & Public Key Cryptography are Diffie Hellman and RSA, respectively. The process may change if any other set of algorithms is used.
TLS handshake’s purpose
- Random number in the first two messages and the finished messages helps avoid replay attacks.
- By embedding the public key in the certificate and creating a signature using the private key, the server proves its authenticity to the client.
- By generating and sharing the premaster key, the client and the server create a master key that is used to encrypt every subsequent message.
References:
- https://www.makemydigitalsignature.com/what-is-the-difference-between-encryption-and-signing/
- http://web.deu.edu.tr/doc/oreily/networking/firewall/ch06_03.htm
- https://cryptobook.nakov.com/symmetric-key-ciphers/cipher-block-modes
- https://crypto.stackexchange.com/questions/27131/differences-between-the-terms-pre-master-secret-master-secret-private-key
- https://www.cryptologie.net/article/340/tls-pre-master-secrets-and-master-secrets/
- https://security.stackexchange.com/questions/63971/how-is-the-premaster-secret-used-in-tls-generated
- https://www.jscape.com/blog/what-is-a-digital-certificate
- https://www.researchgate.net/figure/The-TLS-layers-and-sub-protocols_fig4_321347130
- https://www.cloudflare.com/en-in/learning/ssl/how-does-public-key-encryption-work/
- https://www.youtube.com/watch?v=86cQJ0MMses&ab_channel=Computerphile
